You should allow-list the IP Address and Domains listed in your introduction email, to ensure that your training and simulated phishing emails are delivered to your users correctly. In Microsoft 365, this can be done using the Security Portal.
Please let us know once you have successfully added IP Addresses and Domains to your exceptions list, so that we can perform tests to validate functionality.
If you have performed the applicable steps and still have trouble receiving training, reminders, or simulated phishing emails, please contact support.
Allow-listing by IP Address in Microsoft 365
To allow-list IP Addresses:
- Go to the Microsoft 365 Defender Portal – https://security.microsoft.com/
- Expand Email & Collaboration in the left sidebar and navigate to Policies & rules, Threat Policies and Anti-spam.
- Click Connection filter policy, then Edit connection filter policy on the menu.
- Add the IP addresses 99.80.168.14, 198.21.6.191 & 168.245.56.242 to the Always allow messages from the following IP addresses or address range field.
- Finally, click Save to apply the new settings.
Allow-listing by Domain in Microsoft 365
To allow-list domains:
- Go to the Microsoft 365 Defender Portal – https://security.microsoft.com/
- Expand Email & Collaboration in the left sidebar and navigate to Policies & rules, Threat Policies and Anti-spam.
- Click Anti-spam inbound policy, scroll to the bottom of the menu and click Edit allowed and blocked senders and domains.
- This will open the Allowed and blocked senders and domains screen, click the Allow Domains
- Click Add Domains under Manage allowed domains.
- Enter usecure.io & user-training.com as listed in your Introduction Email.
- Click Add domains at the bottom of the menu.
- Finally, click Done, then Save to apply the new settings.
Advanced Delivery in Microsoft 365
To ensure emails are delivered correctly:
1. Go to the Microsoft 365 Defender Portal – https://security.microsoft.com/
2. Expand Email & Collaboration in the left sidebar and navigate to Policies & rules, Threat Policies, Rules, and Advanced Delivery.
3. Next to the SecOps Mailbox tab, click the Phishing simulation tab.
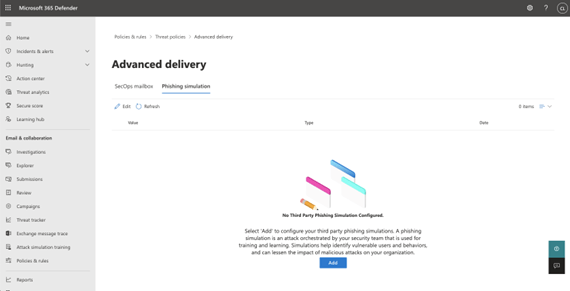

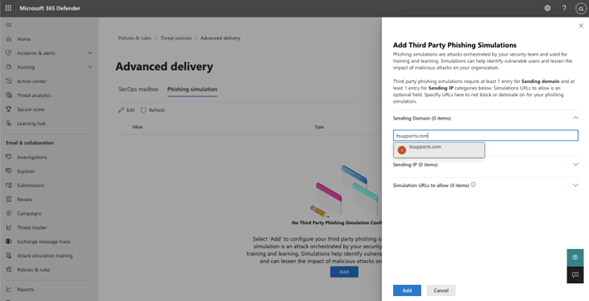
4. Click the blue Add button to configure new settings or edit existing settings.
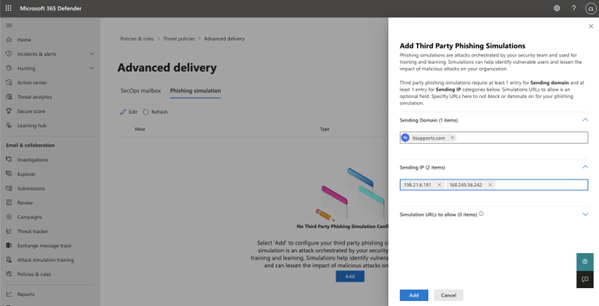
5. Under Sending Domain, enter the domain(s) specified in your introduction email, in the respective fields (do not include usecure.io & user-training.com domains).

6. Under Sending IP input both of the following IPs: 99.80.168.14, 198.21.6.191 & 168.245.56.242

7. Under Simulation URLs to allow, input the selected domains, each followed by /*. For example, itsupports.com would become itsupports.com/* (do not include usecure.io & user-training.com domains)
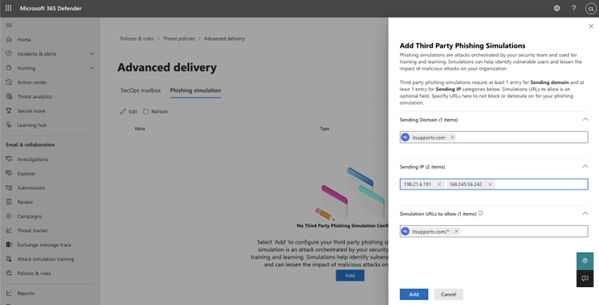

8. Click Add (or Save if you are editing an existing configuration), note that there may be a delay in these changes taking effect.
You may also read instructions for the above on the Microsoft Website.
Allow-list by IP address in Microsoft Exchange 2013 & 2016
To allow-list in Office365 in older versions of Exchange:
- Log in to the Admin portal on your Office 365 mail server.
- Navigate to Admin centers and Exchange in the left-hand menu.
- Under protection, click connection filter.
- Click the pencil icon in the top left of the connection filter screen.
- Click connection filtering on the left-hand menu.
- Under IP Allow list, click the + symbol
- In the Add allowed IP address window, add the IP addresses 99.80.168.14, 198.21.6.191 & 168.245.56.242
- Click OK and Save.
Please note that the connection filter option under protection will not be available if antispam functionality is not enabled on your mailbox server. You can find instructions on how to enable that on Exchange 2016/2019 here and on for Exchange 2013 here. If you do not wish to do this, due to the impact it could have on your organisation, you can find instructions on how update the IP allow list via PowerShell here.
Bypassing Clutter and Spam Filters
To bypass clutter and spam filters:
- Log in to the Admin portal on your Office 365 mail server.
- Navigate to Admin centers and Exchange in the left-hand menu.
- In left-hand menu, click mail flow.
- Click the + symbol in the top left of the mail flow page and select Bypass spam filtering… from the drop-down menu.
- In the new rule window, give your filtering rule a name (such as ‘Training and Simulated Phishing Bypass’).
- Click the drop-down menu, under Apply this rule if…, and choose IP address is in any of these ranges or exactly matches.
- In the window that opens, add the IP addresses 99.80.168.14, 198.21.6.191 & 168.245.56.242
- Click OK to close the window.
- Ensure that the Do the following… field is set to Set the spam confidence level (SCL) to… and that Bypass spam filtering, on the right, is enabled.
- Scroll down to the Match sender address in message option and select Envelope from the drop-down menu.
- Click Save.